Host and first-run setup
Daemonless Reverse Proxy ships as a single container (ghcr.io/daemonless/reverse-proxy:latest) for FreeBSD (amd64, arm64) and Linux (amd64, arm64). Start the container, open the one-time setup link from its log, and complete setup in your browser, with no Caddyfiles or YAML routes to write.
1. Before you start
The proxy listens on three ports:
| Port | Protocol | Purpose |
|---|---|---|
80 |
HTTP | Redirects browsers to HTTPS and serves the /trust certificate download page |
443 |
HTTPS | Serves your named applications |
8443 |
HTTPS | Serves the Reverse Proxy admin UI and REST API before setup completes (and https://proxy.<your domain> afterward) |
Make sure nothing else on the host is bound to TCP ports 80, 443, or 8443.
pfport forwarding: Podman's bridge network on FreeBSD needs thepfrules in the Networking guide before ports80,443, and8443answer.- Auto-start at boot: Keep
restart: alwaysincompose.yaml. FreeBSD'spodmanrc.d script only auto-starts containers withrestart: alwaysat boot whenpodman_enable=YESis set. - Reaching published ports from the host: Without
net.pf.filter_local=1enabled beforepfstarts, a FreeBSD host cannot reach its own published container ports. Openhttps://<host-lan-ip>:8443from another device on your network, or configurenet.pf.filter_local=1as shown in the Networking guide.
- Binding ports
80and443: Run with rootful Podman so Caddy can bind ports80and443. - SELinux hosts (Fedora, RHEL): Keep
security_opt: [label=disable]incompose.yaml(or--security-opt label=disableon the CLI). It lets the proxy use its mounted folders and, when enabled, Podman's socket; hosts without SELinux ignore it.
2. Deploy the container
Choose whichever deployment workflow fits your host:
- Open fjord (
http://<host>:3567), go to the App Store, and select Reverse Proxy. - Optionally switch Name containers by their labels to On if you also want Podman containers on the same host with
io.daemonless.proxy=trueto get names here. - Click Install.
fjord generates RP_PAIRING_KEY and RP_SETUP_TOKEN automatically. Once the stack is running, click Finish setup on the Reverse Proxy row; your browser opens setup already verified.
Download or copy compose.yaml from the Reverse Proxy image page, where you can also toggle container-label socket access, then start the stack and read the setup link from its log:
podman run -d --name reverse-proxy \
  --restart=always \
  --security-opt label=disable \
  -p 80:80 -p 443:443 -p 8443:8443 \
  -e PUID=1000 -e PGID=1000 -e TZ=UTC \
  -v /path/to/containers/reverse-proxy:/config \
  -v /path/to/containers/reverse-proxy/data:/data \
  ghcr.io/daemonless/reverse-proxy:latest

podman logs reverse-proxy
Volumes and environment variables
| Name | Default | What it does |
|---|---|---|
/config |
(required volume) | Admin state (state.json), uptime history (uptime.json), icons, and secrets/ (internal root CA key, DNS credentials). Owned by bsd (PUID:PGID). |
/data |
(required volume) | Certificates issued by Caddy, ACME account keys, and internal CA state. Owned by root. Keep both /config and /data across container upgrades. |
PUID / PGID |
1000 / 1000 |
User and group ID for the unprivileged admin process (web UI and API). Caddy stays root to bind ports 80 and 443. |
TZ |
UTC |
Container timezone. |
RP_ADMIN_URL |
(remembered after sign-in) | External URL where you open the admin UI, e.g. https://192.168.1.5:8443. Optional: makes the first-run link in the log exact before anyone has signed in. |
RP_TRUST_PORT |
80 |
Host port mapped to container port 80 if you publish the HTTP trust page on something other than 80, so QR codes and commands on /trust use it. |
RP_LISTEN |
(all networks) | Space- or comma-separated subnets or interfaces the proxy answers on, overriding the choice in Settings -> Home network. |
RP_DEBUG |
(off) | Set to 1 for Caddy's full INFO-level log; off by default so the log stays readable. |
3. First-run browser setup
On first boot, podman logs reverse-proxy prints a one-time setup banner:
[admin]
[admin] First run. Set up at port 8443 of this machine, over https:
[admin]
[admin]     https://<this machine>:8443/#token=XXXX-XXXX-XXXX-XXXX
[admin]
[admin] Without the link, the page asks for the setup token: XXXX-XXXX-XXXX-XXXX
[admin] RP_ADMIN_URL in the compose makes this link exact.
[admin]
Replace <this machine> with your server's LAN IP, such as https://192.168.1.5:8443/#token=..., and open it in a browser.
Why the browser warns once on :8443
Before setup finishes, the proxy does not know your domain yet, so :8443 uses a self-issued certificate. Accept the one-time browser warning to enter setup. The #token=... part is a URL fragment, which browsers never send over the network, so the setup token cannot land in any HTTP log. After setup finishes, the admin lives at https://proxy.<your domain> with a certificate your devices trust.
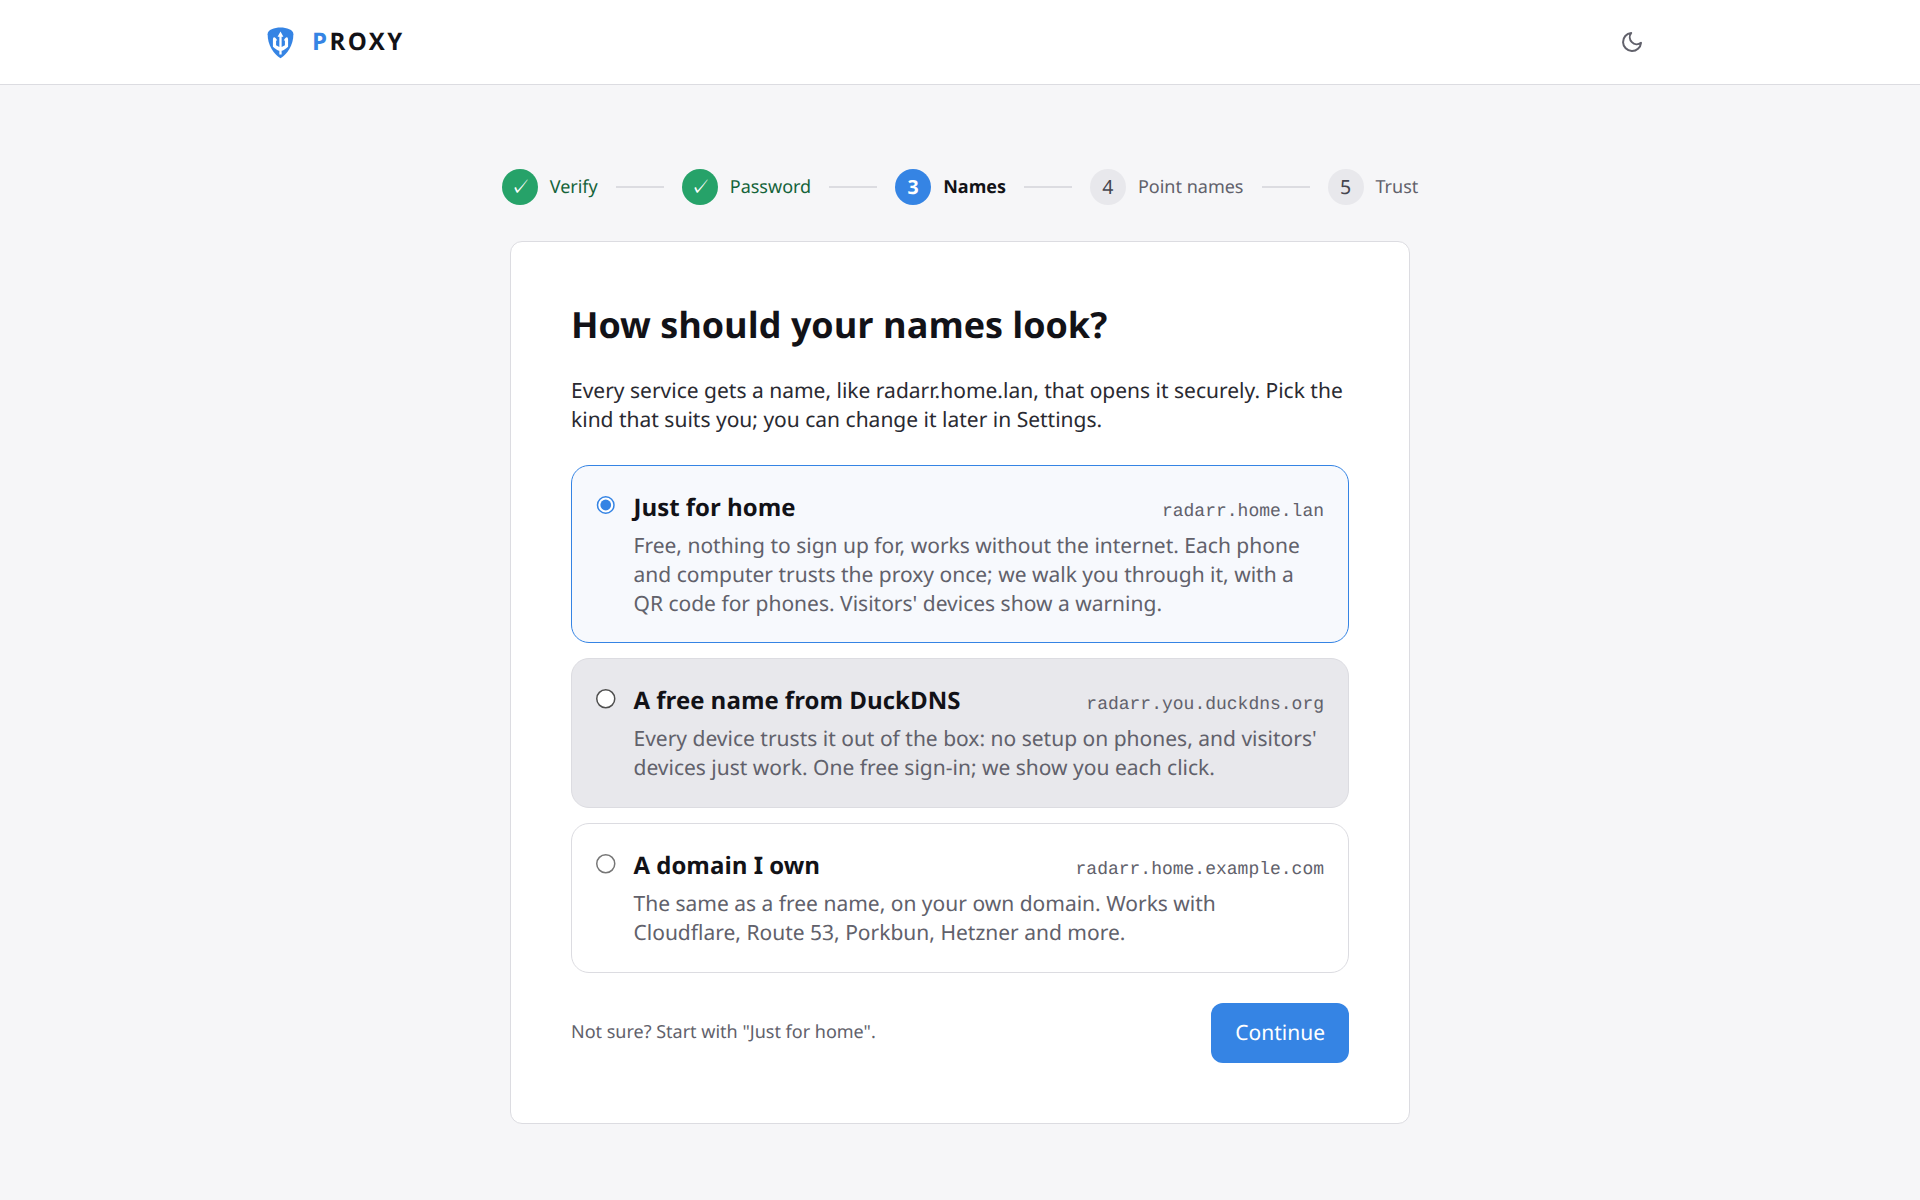
The setup wizard walks through these steps, and each setting can be changed later under Settings:
Step 1: Welcome or restore a backup
- Opening the
#token=link verifies your session automatically (Verified from your link). If you openedhttps://<ip>:8443without the link, paste the setup token frompodman logs reverse-proxy, or open setup from fjord if fjord installed the proxy. - Moving from another machine? Click Restore a backup on the Welcome screen, select your
.rpbkfile, enter its passphrase if you set one, and click Restore. Names, settings, DNS tokens, and your root CA return at once.
Step 2: Choose an admin password
Set the password for the Reverse Proxy admin UI. Passwords are checked locally and stored hashed on disk. If you forget it later, run podman exec reverse-proxy reverse-proxy reset-password on the host to print a new setup link without losing your names or certificates.
Step 3: Home network (multi-VLAN hosts only)
When the container is on more than one network, such as when fjord attaches VLAN interfaces so the proxy can reach apps across VLANs, setup asks which networks are home:
- Ticked networks can open the admin UI and your home-only names.
- Unticked networks get no answer at all, and their devices are never treated as home whatever your router does, while the proxy still reaches apps running on them.
- The network your browser is connecting from stays ticked so you cannot lock yourself out.
Step 4: How names should look
Pick one of three ways to name services on your network:
- Just for home (
apps.lan,home.arpa,home.lan): free, works without the internet, and creates a root certificate restricted to that ending. - A free name from DuckDNS (
radarr.you.duckdns.org): walks you through signing in atduckdns.org, adding a subdomain, and pasting your 36-character token. Obtains a Let's Encrypt wildcard certificate that every device already trusts. - Your own domain (
radarr.example.comorradarr.home.example.com): looks up where your domain's DNS is hosted, pre-selects your DNS provider (Cloudflare, Route 53, DuckDNS, deSEC, Porkbun, Hetzner, OVH, Gandi, My own DNS server (RFC 2136), or acme-dns), tests your token on Let's Encrypt's staging service first, and gets one wildcard certificate for every name under it.
See Certificates, DNS, and access control for the API token permissions each DNS provider requires.
4. Point names at the proxy
Devices on your home network need *.<your domain> to resolve to the LAN IP of the host running Reverse Proxy.
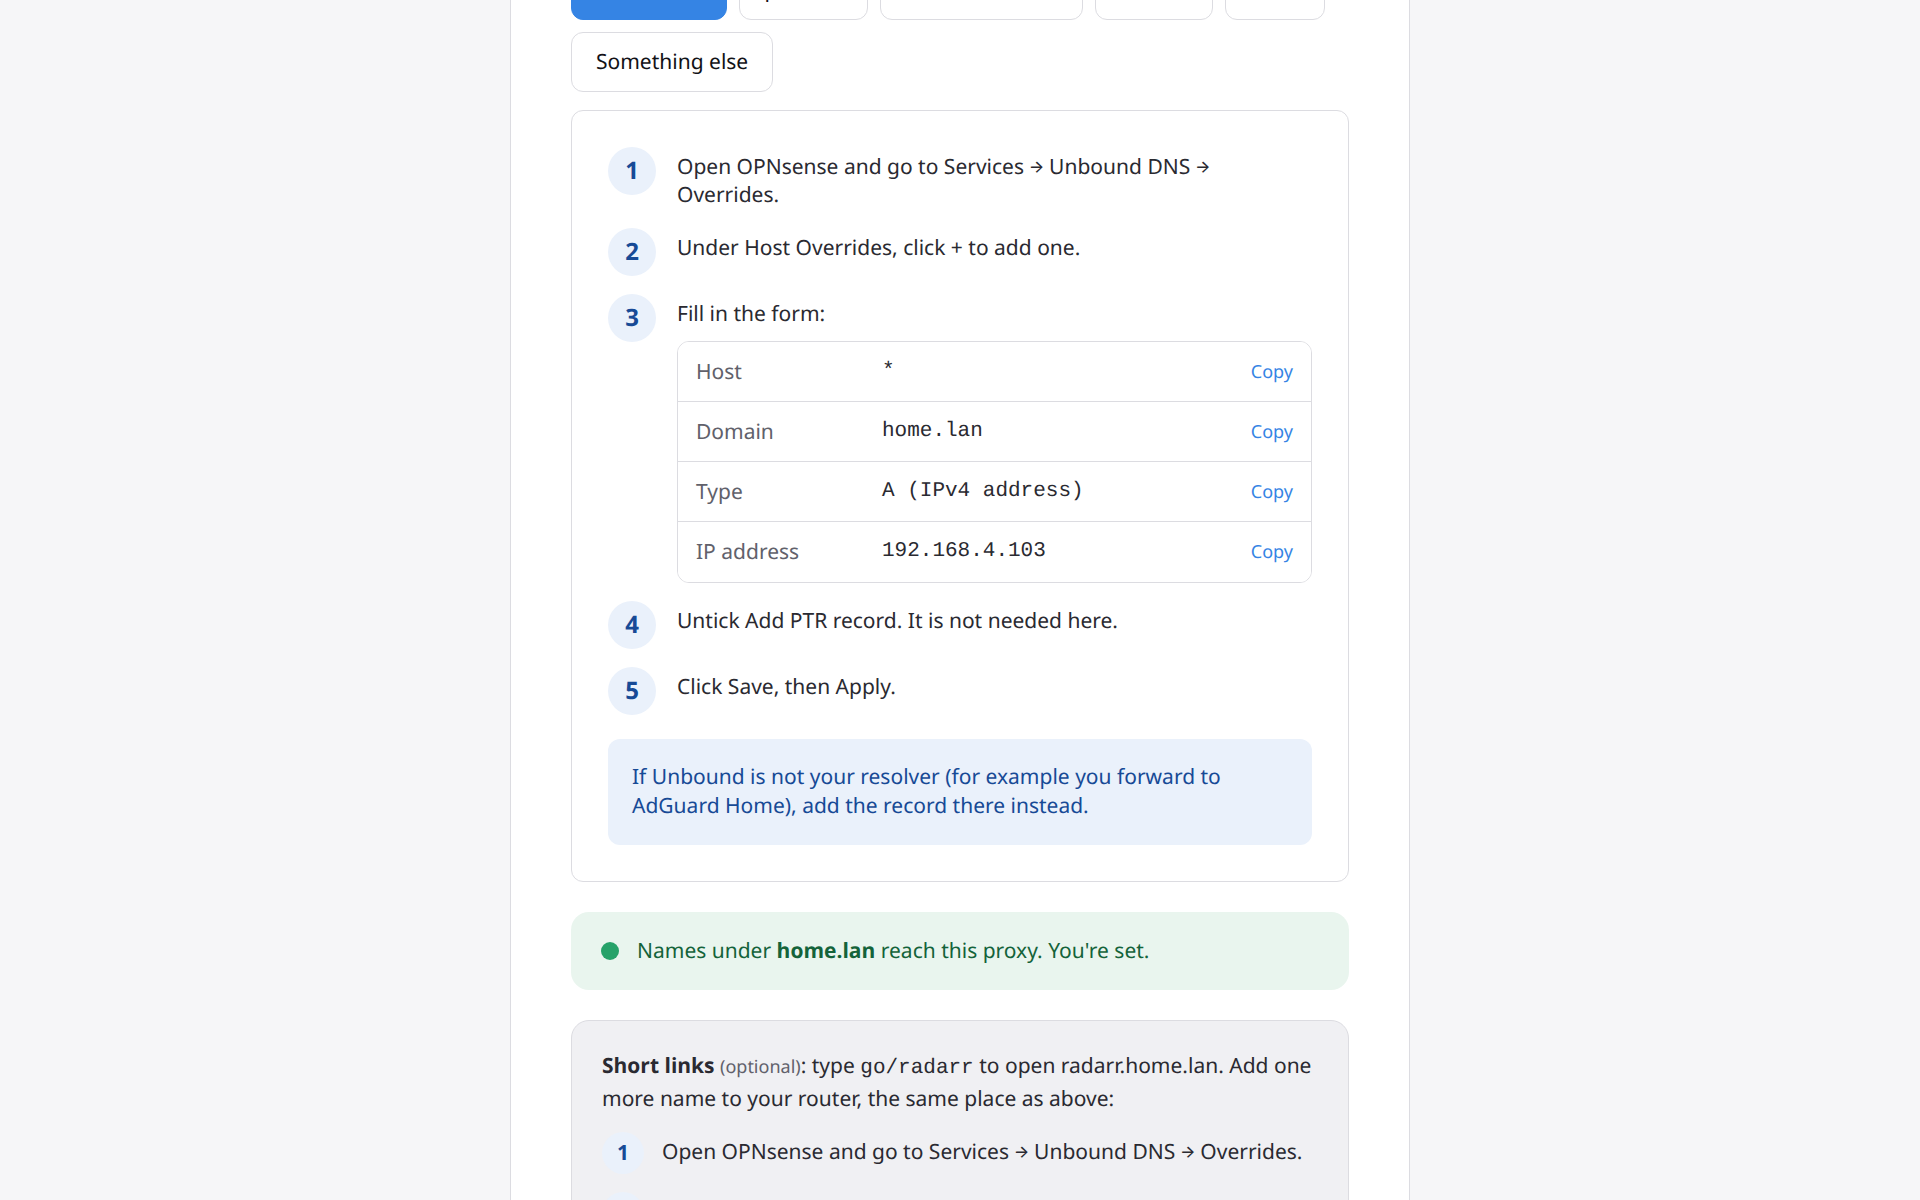
Pick your router or DNS server in setup to get the values for your domain and IP. The page checks DNS automatically and turns green when queries reach the proxy:
- Open OPNsense and go to Services -> Unbound DNS -> Overrides.
- Under Host Overrides, click + to add one:
- Host:
* - Domain:
<your domain> - Type:
A (IPv4 address) - IP address:
<proxy LAN IP>
- Host:
- Untick Add PTR record, click Save, then Apply.
If Unbound is not your resolver (for example you forward to AdGuard Home), add the record there instead.
pfSense's Host Overrides form cannot take a wildcard, so the record goes in Unbound's custom options:
- Open pfSense and go to Services -> DNS Resolver -> General Settings.
- Click Display Custom Options at the bottom and paste the lines from the wizard:
- Save, then click Apply Changes.
- Open AdGuard Home and go to Filters -> DNS rewrites.
- Click Add DNS rewrite:
- Domain:
*.<your domain> - Answer:
<proxy LAN IP>
- Domain:
- Save.
Pi-hole's Local DNS Records form cannot take a wildcard, so create /etc/dnsmasq.d/99-reverse-proxy.conf on the Pi-hole machine:
echo "address=/home.lan/192.168.1.5" | sudo tee /etc/dnsmasq.d/99-reverse-proxy.conf
pihole restartdns
Pi-hole 6
Pi-hole 6 ignores /etc/dnsmasq.d until you turn on misc.etc_dnsmasq_d in Settings -> All settings (expert mode).
- Open the UniFi Network app and look for Local DNS Records (recent versions: Settings -> Routing -> DNS; older: under Networks or the Policy Table).
- Add a record: Domain
*.<your domain>pointing at<proxy LAN IP>. - If your version refuses a wildcard (
*), add two records for now,proxy.<your domain>and the first host you create, both pointing at<proxy LAN IP>.
If your UniFi gateway forwards DNS to another server (AdGuard Home, Pi-hole), add the record there instead.
Optional: enable go/radarr short links
On the same DNS step, setup offers one optional A record (go under your network's local domain, such as go.lan pointing at <proxy LAN IP>). Once added:
- Typing
go/radarrin a browser openshttps://radarr.<your domain>, keeping any path after it. - Typing
go/opens the proxy's Names page. - The first time in Safari or Firefox, type
http://go/radarrwithhttp://, or the browser will search the web for it instead.
5. Trust the proxy on your devices (Just for home only)
If you chose DuckDNS or Your own domain, Let's Encrypt certificates are already trusted by every device, and setup goes straight to Done.
If you chose Just for home, each device trusts the proxy's root certificate once. You can reopen these steps anytime at http://proxy.<your domain>/trust or https://proxy.<your domain>/trust, including a QR code for phones:
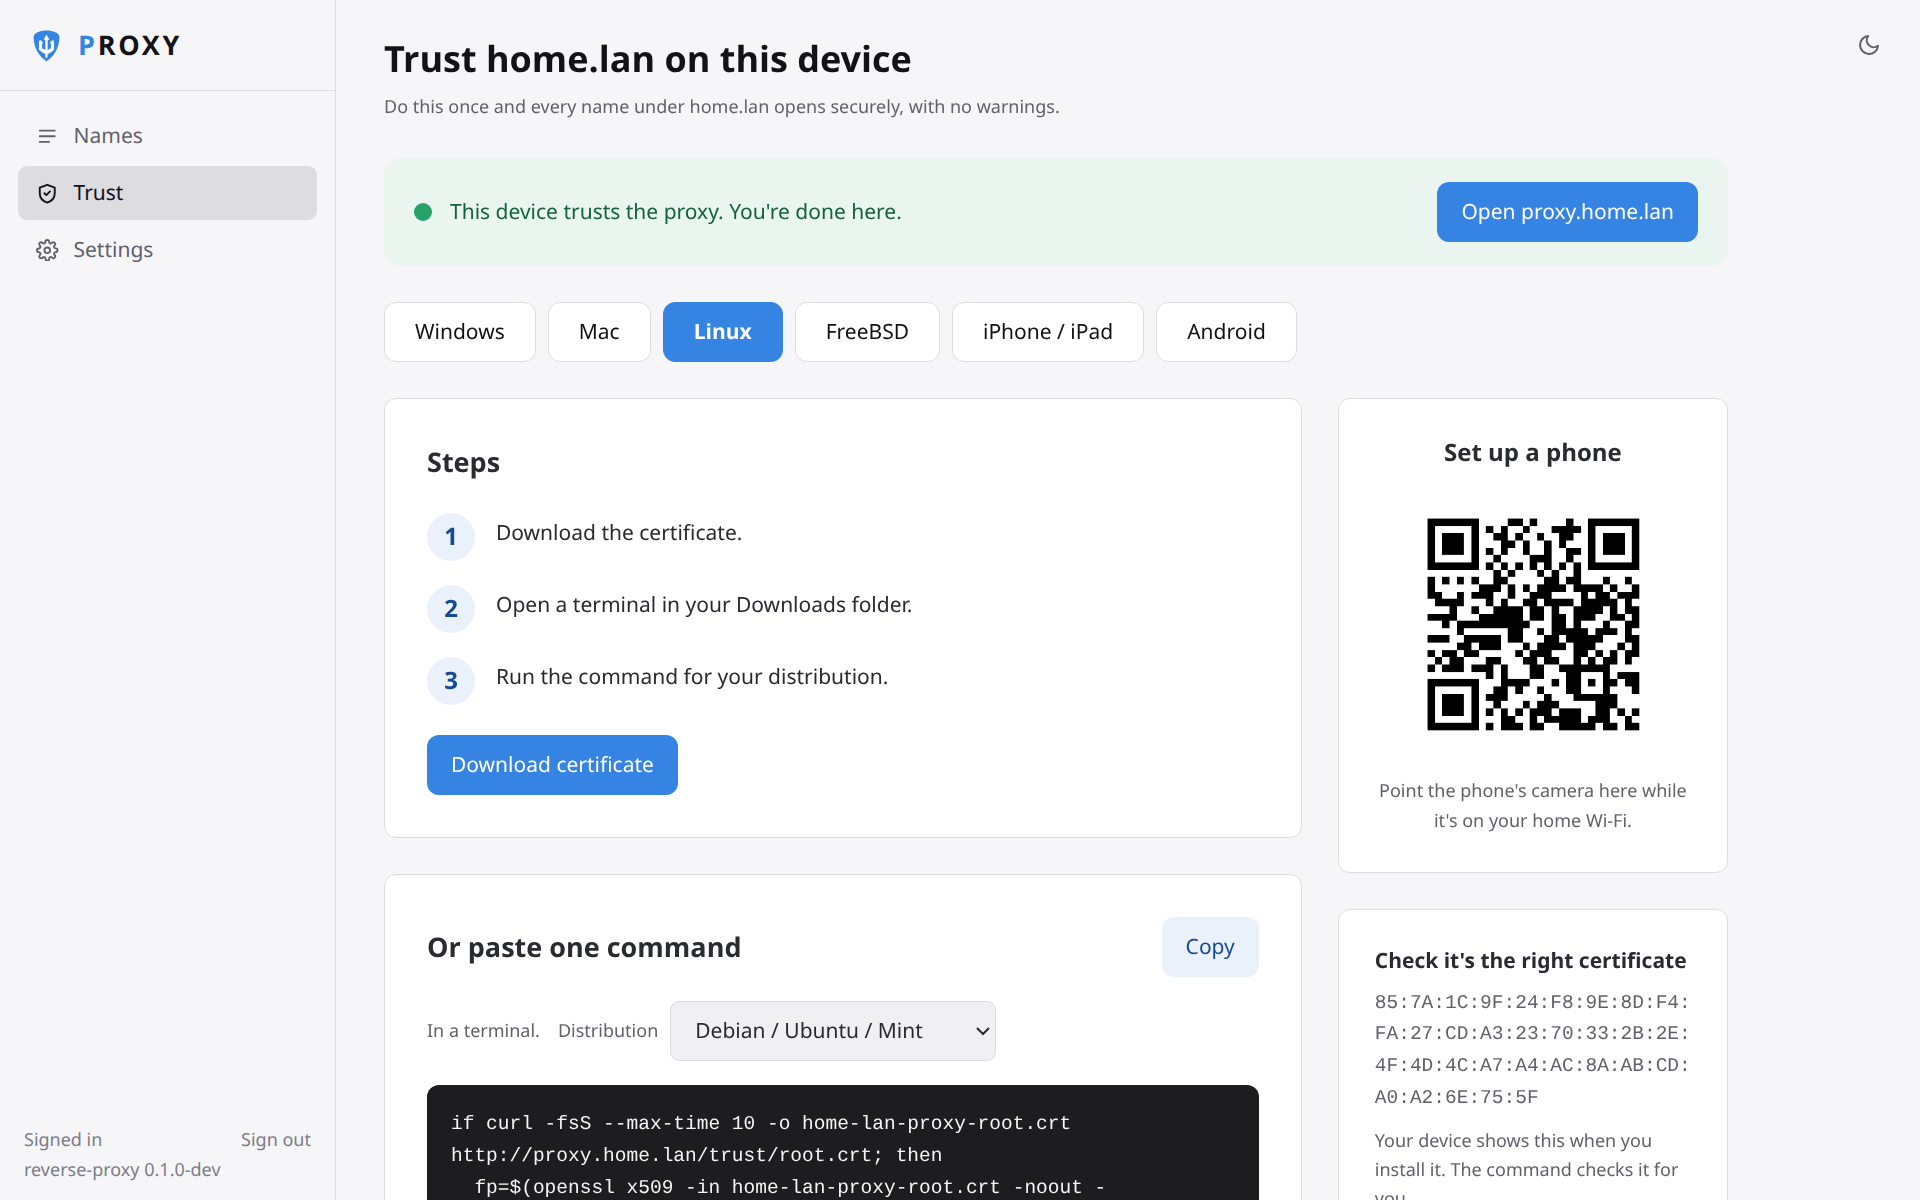
Every command block on /trust checks the certificate's SHA-256 fingerprint before installing it, so a modified download over plain HTTP installs nothing:
- iPhone / iPad: Scan the QR code in Safari -> tap Download certificate (Allow, then Close) -> open Settings -> Profile Downloaded -> Install -> back in Settings, go to General -> About -> Certificate Trust Settings and switch on the proxy root. Step 3 is the one people miss: installing the profile is not enough on its own.
- Android: Scan the QR code -> tap Download certificate -> open Settings -> Security (or Security & privacy) -> More security settings -> Encryption & credentials -> Install a certificate -> CA certificate -> tap Install anyway and choose the downloaded file.
- Windows: Run the PowerShell command from
/trustin an Administrator PowerShell window (checks SHA-256 and imports intoCert:\LocalMachine\Root), or open the downloaded file -> Install Certificate -> Local Machine -> Trusted Root Certification Authorities. - Mac: Run the Terminal command on
/trust(sudo security add-trusted-cert -d -r trustRoot -k /Library/Keychains/System.keychain ...), or double-click the certificate in Keychain Access and set When using this certificate to Always Trust. - Linux: Run the
/trustcommand for Debian/Ubuntu (update-ca-certificates), Fedora/RHEL (update-ca-trust), or Arch (trust anchor --store). Chrome and Chromium on Linux keep their own store;/trustshows thecertutil -d sql:$HOME/.pki/nssdbcommand for them. - FreeBSD: Run the
/trustcommand (cp ... /usr/local/share/certs/ && certctl rehash, usingroot,doas, orsudo). - Firefox: Open Settings -> Privacy & Security -> Certificates -> View Certificates -> Authorities -> Import, select the downloaded file, and tick Trust this CA to identify websites.
6. Add your first name
Once setup finishes, open https://proxy.<your domain>:
- If you installed from fjord or turned on Names from container labels, your apps are already listed or named.
- To add a service by hand, click Add a name, type the name (such as
radarr), and paste the address you open today (such as192.168.1.20:7878). - Reverse Proxy checks whether the target speaks HTTP or HTTPS, accepts self-signed upstream certificates when needed, issues its HTTPS certificate, and starts 1-minute uptime checks.